How To: Use language variables
WCF 2.0 comes with built-in internationalization (i18n) or, as some call
it, multi-language support. I18n within WCF 2.0 is realied using so called
language variables. Those variables can be filled with values in multiple
languages and even allow adminitrators to translate their whole board to
another language themselves. But how do plugin developers use language variables
correctly?
In the last article,
where I wrote about creating a simple WCF 2.0 pugin, I presented a template in
which the term “Hello, World!” was hard coded into the template in english.
This is not only strongly discouraged, but is also dangerous in terms of
encoding and escaping. Languages variables ansure the proper ecspaing of HTML
entities and much more, therefore one should always use language variables over
hard coded text.
Modifiying the template
In templates, we can use the {lang}...{/lang} template tag to render the
contents of a language variable. if the variable is not found, the name of the
variable is put out instead. So, a modified version of the template from
the last article would look like this:
{include file='documentHeader'}

<head>
    <title>{lang}wcf.page.helloworld.title{/lang} - {PAGE_TITLE|language}</title>

    {include file='headInclude' sandbox=false}
</head>

<body id="tpl{$templateName|ucfirst}">

{include file='header'}

<header class="boxHeadline">
    <h1>{lang}wcf.page.helloworld.title{/lang}</h1>
</header>

{include file='userNotice'}

{lang}wcf.page.helloworld.info{/lang}

{include file='footer'}

</body>
</html>
Here we use two language variables – wcf.page.helloworld.title for the
page title, which is also used in the heading, and wcf.page.helloworld.info
which will hold the text in the blue information box. You might notice that I
have removed the whole <p class='info'>...</p> box altogether. This is right –
you can use HTML and even template scripting inside language variables.
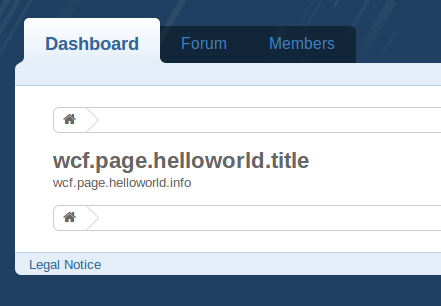
By now, the page will look like this:

Deploying language variables
In order to define values for our language variables, we will use the Language-
PIP, which is XML-based. Therefore, we create a new folder named lang/ in
our plugin, and place two files there, namely de.xml and en.xml.
The lang/en.xml file will look like this:
<?xml version="1.0" encoding="UTF-8"?>
<language xmlns="http://www.woltlab.com" xmlns:xsi="http://www.w3.org/2001/XMLSchema-instance" xsi:schemaLocation="http://www.woltlab.com http://www.woltlab.com/XSD/maelstrom/language.xsd" languagecode="en" languagename="English" countrycode="en">
	<category name="wcf.page">
		<item name="wcf.page.helloworld.title"><![CDATA[Hello, World!]]></item>
		<item name="wcf.page.helloworld.info"><![CDATA[<p class="info">my first page!</p>]]></item>
	</category>
</language>
Like in the package.xml file, we again declare the used sheme, which in this
case is the scheme for language files. Moreover, we declare for which language
this file is used - in this case english.
by now you will most probably have notices the <categories> block. Language
variables withing WCF are separated into categories. The name of a language
variable alsways has to be prefixed with it’s category. It is most important
always to use the correct category, as unexpected things can happen if you use
the wrong language category (this was cause for much trouble for early WCf 1.x
plugins). Unfortunately, as of now there is no documentation about the
existing language categories available. Therefore, you will need to take a look
into the WCF database youself.
In this case, wcf.page is the correct category.
<instruction type="language">language/*.xml</instruction>